Year after year we start seeds, till the ground, plant, weed, harvest, then tear it all out at the end of the season. It’s a lot of work, no doubt. But there are some plants you can plant once that will produce a lifetime of food after they are established. Old-timers knew the value of these plants and added them to their new homesteads.
Pioneers carefully wrapped and tended baby fruit trees, grapevines, rhubarb, and asparagus roots in their covered wagons. Maybe it’s time to lighten your annual workload by adding some of these hardworking plants to your garden. If you do, you’ll reap the rewards for many years.

Asparagus
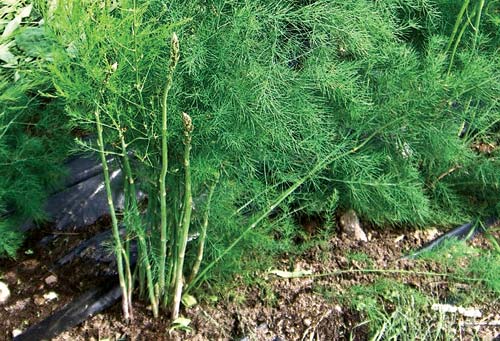
Asparagus is perhaps the easiest, most commonly grown permanent crop. A small family can easily use 25 roots, planted on the edge of a small garden, along a fence, or here and there among flower beds. More roots will give you plenty for dehydrating and canning; asparagus handles both very well. Asparagus plants are ferny, airy, and pretty. They easily blend in well in the back of flower beds, and don’t crowd flowering plants at all.
When you plant asparagus from seed, it usually takes four years before you get an appreciable harvest of asparagus from your row or bed. By planting one-year-old roots, you save a year and can usually begin harvesting lightly in three years. And by planting two-year-old roots, you can again save another year, lightly harvesting your first good spears in two years. Varieties such as the all-male Jersey Knight, Jersey Giant, and Jersey Supreme produce the most (and fattest) spears, while the cheaper old variety Mary Washington will give you quite a lot of asparagus for very little money. As asparagus is a one-time purchase, I chose Jersey Supreme and Jersey Giant for our plantings and have had great luck.
Preparing your asparagus beds for planting is quite important because your asparagus will be there for a long, long time. Till the soil well, then work in abundant rotted manure and compost. Asparagus requires a lot of nutrients to grow and produce well.
I dig a wide furrow 18 inches deep. If I’m planting a bed, I make three parallel furrows about 18 inches apart. Mound up a little rotted compost every two feet and gently spread the octopus-like roots over it. The crown should be well below the top of your furrow. Pull some more compost/soil mixture over the roots, covering the crowns by about two inches. Your trench should be only two-thirds full. Water well, but do not keep the area soggy.
As the asparagus sends out spears, gently add more soil and compost to the trench until it is even with the soil level. The spears will continue growing. Never pick any spears the first year or you will severely damage your plant and its ability to thrive. Be patient.
If you’ve planted two-year-old roots, you will probably get a few fat spears the following spring. You may harvest a few of them to satisfy your impatience, but only take the very biggest ones, and lightly at that. Then let the plant go on to mature; it’ll help the root system develop. To harvest spears, cut them off with a sharp knife, just below the surface of the soil. This encourages more new spears to grow and reduces the incidence of disease.
The next year you’ll be able to widen your harvesting window to about 2-3 weeks, again only picking the fattest spears. After that, you can pick your spears until they begin to get small or tough. At that point, let the ferns develop and the plant store up nutrients to grow strong roots and prepare for winter.
I mulch my asparagus well every spring before it starts to grow; asparagus pokes up nicely through mulch and the mulch not only prevents weeds but keeps the roots moist during dry spells.
After the asparagus is finished and the ferns have dried in the fall, I toss several inches of rotted manure over the bed. This decomposes over the winter and nourishes the whole bed. Never use fresh manure on the bed, especially in the spring. It can lead to E. coli bacteria on your fresh spears.
Chives

Chives are one of the easiest and most useful of all small garden permanent plantings. I’ve seen them planted in pots on the decks of inner-city apartments, brought inside and placed in a sunny window for winter harvest. Because the bushy, onion-like tubular leaves are so attractive, they look good planted on the easily-accessible edges of flower beds. Even the lavender-colored chive flowers are edible.
In the spring, I start my chives from seed in small pots in a sunny windowsill. When the weather is settled, they can easily be set out where they will stay. With a little watering and weeding, the plants soon spread out and produce tons of tasty greens. I harvest mine when they are at least four inches tall, before the flowers bud, by clipping the whole plant off with kitchen scissors.
The harvested leaves can be snipped into small pieces and added to cottage cheese, soft cheeses, soups, stews, salads, and many other recipes. We like them on freshly baked potatoes and even on mashed potatoes. The chive leaves dehydrate easily and quickly, retaining both their flavor and color, to be rehydrated to use later on. I usually let some of my chives go on to flower and keep others clipped short until fall, when I let them grow so the leaves can nourish the plant over winter.
Jerusalem Artichokes
Like asparagus, Jerusalem artichokes (also called sun chokes) are at home on the edge of the garden or tucked here and there around the yard. They are not from Jerusalem nor are they an artichoke, but instead are a member of the sunflower family and native to this continent. They form a large bushy plant and have pretty yellow sunflower-like blooms in the late summer. Under the soil, they form quite large, rounded tubers, almost like potatoes.
These are crunchy, sweet, and great additions to stir fries, salads, or eaten chilled and raw! The first time I planted them, my youngest son, David, was two. He asked what those things were, so I cut one in half with my pocket knife, peeled it, and handed it to him. He finished it right down and then proceeded to eat half of the tubers that I had in the bag to plant! He’s 20 now, and still likes them, and we have a large patch down in the corner of our garden where I can see their pretty blooms from the house.
Jerusalem artichokes produce many large tubers per plant, along with a bunch of smaller ones. While you dig the large ones in the fall, you never can get all of the tubers. Any that are left in the ground will go on to make new plants, each producing lots of new tubers. If you want, you can also dig smaller tubers and replant them in a different location to increase your planting.
Like asparagus, you can plant Jerusalem artichokes in the back of flower beds, along your house, or across one end of your suburban yard, as a tall privacy hedge that will give you plenty of good eating.
Jerusalem artichokes are easy to plant. Just spade up a nice spot, add some rotted compost, if you wish, then plant a small tuber (or a cut piece of a large one) about three inches deep. Water and keep weed-free. Soon, plants will emerge and begin to grow lustily. They are a tough plant, despite their pretty looks. Once planted, they will produce for years.
Horseradish
Horseradish is one of our favorite condiments; its hot, spicy flavor perks up any meat or fish dish. It is a long, tan-colored root; the leaves that grow from it are strap-like and tough. Horseradish is so easy to grow that it can become invasive, especially in your garden. It’s a good idea to plant it in an isolated area or container — not in the garden or in your flower bed.
I planted my horseradish 200 feet from our home gardens and flower beds; I figure that by the time it invades those, I’ll be long gone. Plant your horseradish bed as far from domestic plantings as you practically can. Till up a spot, add rotted compost if you wish, then plant the roots on a slight angle, wide end up. If you’re planting crowns, keep the growing crown up. Plant the top of the roots about two inches deep, and crowns just below the soil surface. Water and keep weed-free until growing well. The more you weed and water, the thicker your roots will be and the less work it will be to make your own horseradish sauce; the roots must be well scrubbed or peeled before grating and thicker roots yield more end product than do thinner ones.
I harvest my horseradish in the late fall after a few cold snaps, but before the ground freezes. Using a potato fork or shovel, I carefully dig the whole plant, being careful not to cut the root. Like Jerusalem artichokes, you always leave some small roots behind, and every one of them will grow and spread. Once planted, I don’t think you’ll ever have to plant horseradish again.

Mushrooms
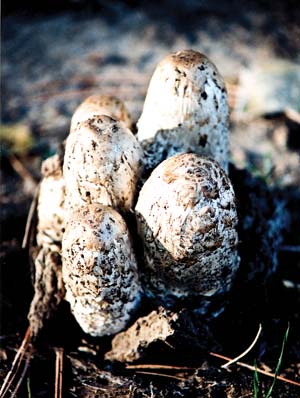
Few people think of mushrooms as a “vegetable” or as a homestead crop, but they can be just that. With most of today’s canned mushrooms coming from China and Indonesia, more and more people are thinking about growing their own mushrooms at home. The indoor “mushroom kits” were a start, but now there are many more economical and permanent sources of a wide variety of mushrooms available for home growers.
Such common varieties as Morels, Chicken of the Woods, Oyster, Lion’s Mane, and Button can all be easily grown in small areas on the homestead. You can “plant” them in a corner of your garden, in an unused part of your lawn, or even on the edge of the woods. Some varieties, such as Shiitake and Portabella, require drilling holes in stumps or logs and placing plugs containing mushroom spawn in them. Other kinds only require mixing with compost or wood chips, sprinkling over a raked area, and watering in. There are several companies that deal extensively in mushroom growing supplies, but the one I’ve dealt with is Fungi Perfecti which has a very wide variety of mushrooms available, as well as a lot of information.
It often takes a while to get a mushroom bed or “patch” started, but once you do, it will last for years and years with little care. Harvests of many pounds of great mushrooms are definitely possible for even the smallest grower.
Onions
While most people think of onions as an annual crop, there are two kinds of onions that are perennial: potato onions and multiplier onions. Multiplier onions are the most common, and are available in many seed and nursery catalogs. Multiplier onions are also known as “walking onions” because they form a cluster of little onion bulbs in the summer, on a seed stalk. As fall lengthens, the stalk bends over and the already-sprouting bulbs touch the soil and root. So, after a while, your permanent onions that started out on one end of the garden, may have moved to an entirely different spot! These onions make terrific spring and early summer green onions and some of the topset bulbs are large enough to peel and pickle. Grandma had several multiplier onions in her asparagus patch, so it didn’t matter much where they walked. Mine are there, too. You can plant several in flower beds, near the back, yet in an accessible spot, as they are tall, handsome plants.
Potato onions also make top-set bulbs, but the great thing about them is that they also make a “nest” of rather large onions underground. Some are as large as smaller storage onions. They taste great and store very well over winter in your cellar. You can remove the larger underground onions to store or use, taking some of the smaller ones to pickle, as well as some of the larger topset bulbs. Then, by planting the smaller bulbs, both topsets and underground bulbs, you can keep your potato onion planting going forever. Potato onions are available from Potato Garden, 12101 2135 Rd, Austin, CO 81410. (www.potatogarden.com, phone: 877-313-7783)

Rhubarb
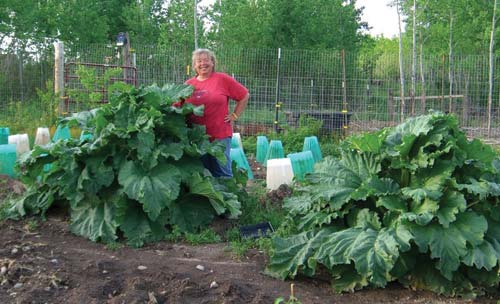
Rhubarb is a nearly indispensable plant for anyone wanting to have “quick fruit” for pies, desserts, and preserves. While technically a vegetable, it’s called “pie plant” for good reason. Its red and green stalks are tart and succulent, making terrific pies, jams, and preserves. And, best of all, it grows very quickly into a lusty and useful plant. By planting a couple of two-year-old or older roots, you’ll be able to harvest lightly the next spring. From there on out, you’ll have all you could ever want.
Rhubarb is a gorgeous plant with huge leaves. It makes a terrific background plant for a corner of a suburban yard (in place of the “fancy” Great Gunnera, highly touted in nursery catalogs). And, as rhubarb is easily divided when it gets a few years old, you can usually get a root or two from a friend for free!
Rhubarb loves plenty of rotted manure, so put an 8-inch-deep layer around it in the spring and fall, and soon your plant will be huge.
There are plenty of other plants you can use in your edible landscape, including a whole array of herbs and fruit, which I haven’t even touched on, but by now I’m sure your mental wheels are turning. If you need more information on growing any of these permanent crops, my book, Growing And Canning Your Own Food, has a lot more information than I could squeeze into this article (Via BackwoodsHome).
If you like this idea, be sure to share it with your friends and inspire someone you know. Anything becomes possible with just a little inspiration…
