How To Become More Self-Sufficient Without Starting a Full-Blown Farm…
Want to start preserving your harvest, making your own soap, or building a backyard root cellar — but not sure where to begin? “Homesteading Advice” gives you instant lifetime access to 35+ practical homesteading books on food preservation, veggie gardening, DIY natural cleaning products (save over $250 per year with this skill alone), brewing, off-grid energy, and a whole lot more…
Click Here To Check It Out Now!
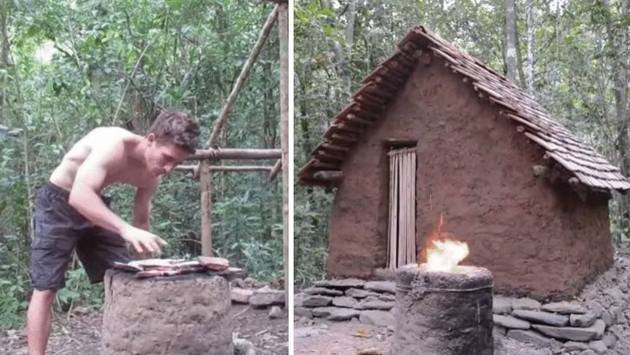
I built this tiled roof hut in the bush using only primitive tools and materials. It should be pointed out that I do not live in the wild and that this is just a hobby. It should be obvious to most that this is not a survival shelter but an experiment in primitive building technology.
The wooden frame was built with a 2 x 2m floor plan and a 2m tall ridge line with 1m tall side walls. 6 posts were put into the ground 0.25 m deep. The 3 horizontal roof beams were attached to these using mortise and tenon joints carved with a stone chisel. The rest of the frame was lashed together with lawyer cane strips. The frame swayed a little when pushed so later triangular bracing was added to stop this. Also when the mud wall was built, it enveloped the posts and stopped them moving altogether.
A small kiln was built of mud from the ground and a perforated floor of clay from the creek bank. Clay was dug, broken tiles (from previous batches) were crushed and added to it as grog and it was mixed thoroughly. This clay was pressed into rectangular moulds made from strips of lawyer cane to form tiles. Wood ash prevented the clay sticking to the stone. 20 tiles were fired at a time. 450 flat tiles and 15 curved ridge tiles were made with only a few breakages. 26 firings were done in all and the average firing took about 4 hours. The fired tiles were then hooked over the horizontal roof battens.
An underfloor heating system was built into one side of the hut to act as a sitting/sleeping platform in cold weather. This was inspired by the Korean Ondol or “hot stone”. A trench was dug and covered with flat stones with a firebox at one end and a chimney at the other for draft. The flames travelled beneath the floor heating it. After firing it for a while the stones stay warm all night with heat conducted directly to the sleeping occupant and radiating into the room.
The wall was made of clayey mud and stone. A stone footing was laid down and over this a wall of mud was built. To save on mud, stones were included into later wall courses. The mud was dug from a pit in front of the hut and left a large hole with a volume of about 2.5 cubic metres.
The finished hut has a swinging door made of sticks. The inside is dark so I made a torch from tree resin. A broken tile with resin on it acts as a small lamp producing a lot of light and little smoke. The end product was a solid little hut, that should be fire and rot resistant. The whole project took 102 days but would have taken 66 days were it not for unseasonal rain…
If you like this idea, be sure to share it with your friends and inspire someone you know. Anything becomes possible with just a little inspiration…

