How To Become More Self-Sufficient Without Starting a Full-Blown Farm…
Want to start preserving your harvest, making your own soap, or building a backyard root cellar — but not sure where to begin? “Homesteading Advice” gives you instant lifetime access to 35+ practical homesteading books on food preservation, veggie gardening, DIY natural cleaning products (save over $250 per year with this skill alone), brewing, off-grid energy, and a whole lot more…
Click Here To Check It Out Now!
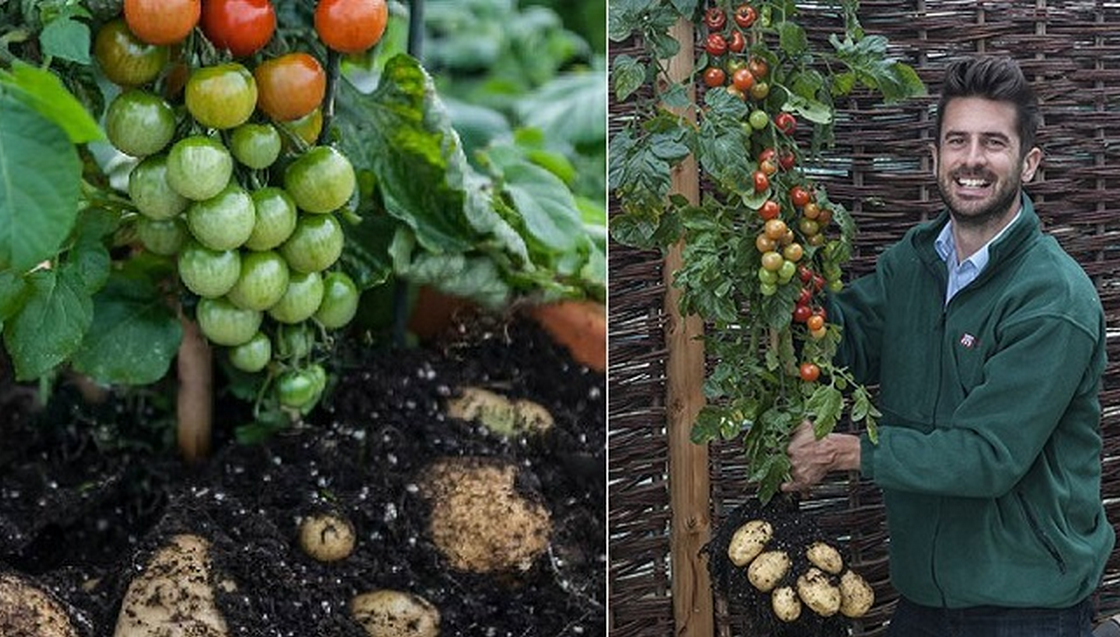
Most fruit and vegetable plants of the same family, including potato and tomato plants of any variety, can be grafted to create one plant. The upper part of the graft becomes the top of the plant and produces tomatoes, while the lower section or root system will produce potatoes.
This method of grafting is a common practice for gardeners who don’t have a lot of space to work in; however, a grafted plant will yield much less than two plants growing separate.
Grafting is best done with two healthy plants that have stems of similar diameter…
Things You Will Need…
- 1-gallon container
- Soil-less potting mix
- Potato seedling
- Tomato seedling
- Knife
- Grafting tape
Here’s How It’s Done…
- Fill a well-draining 1-gallon container with a soil-less potting mix, leaving a 2-inch space between the soil and the brim. Take care not to compact the soil as you are placing it in the container.
- Plant a 6-inch potato seedling and a 6-inch tomato seedling with the stems 1/4 inch apart in the center of the container by creating a hole that is just large enough for the two root balls combined. Separate the roots before setting in the hole, and backfill around the root ball with the soil. Water thoroughly.
- Cut a “V” shape into the stem of each plant 1-inch long and one-third the thickness of the stem with a sharp knife exposing the cambium layer. Make the cut 3 inches from the top of both plants, so the open areas line up when the plant stems are held together. The cambium layer, the third layer of the stem’s interior, contains active cells that generate growth for the plant
- Connect the two plant stems by sliding the “V” shapes together and securing with grafting tape. Wrap the tape around where the two plants come together, sealing off the cut area entirely. Remove the tape when the plant begins to show signs of new growth.
- Remove the top portion of the potato plant and the bottom portion of the tomato plant with pruning shears after a strong union between the two plants forms. Cut the potato plant stem at a 45-degree angle 1 inch above the grafting joint, and the lower portion of the tomato plant stem at a 45-degree angle 1 inch below the grafting joint and soil level at the base of the root system to create one plant. Leave the roots of the tomato plant in the soil; as they break down, they will add nutrients to the soil.
A Few Tips:
Water the grafted planted regularly until the soil is saturated, allowing the soil to dry out between watering. Signs of yellowing leaves and wilting are an indication that the graft isn’t working. Article via: SFGate
If you like this idea, be sure to share it with your friends and inspire someone you know. Anything becomes possible with just a little inspiration…

